Easy Homemade Artisan Bread to Impress Your Friends
Have you seen the no-knead bread circulating around on Pinterest? The one you bake inside a dutch oven? Well I made it four times now and it really is as AMAZING as it looks.
I have never made bread before. This just sounded too easy so I had no excuse not to try it out. It really does only take about 5 minutes of work. The oven does the rest :)
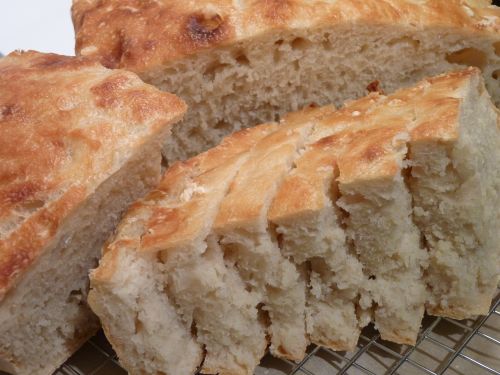
For my very first homemade bread, I was really impressed. I had low expectations so I was totally blown away when I saw the finished bread! It looked like one of those $10 loaves at the bakery and it tasted amazing. It was crusty on the outside but chewy and moist on the inside. Plus, it came right out of my dutch oven and it barely made any mess. It's literally no work to make, tastes out of this world, makes no mess, costs less than a $1 to make - all too good to be true! What is the catch? Well, I think the dutch oven may have something to do with it. If you don't have one, you'll need to invest in one to make this. I have only used mine for baking this bread but of course it can be used for many other things as well :)
Remember the clunky heavy cake stand I bought? Well, that wasn't the only clunky heavy thing I bought recently. Ahem. We were in Seattle not too long ago and we bought a Le Creuset square casserole stoneware
Many other companies like Cuisinart are coming up with their versions of the enamelled cast iron cookware and are much more affordable than Le Creuset. I don't know how they compare but I can tell you that I love our bakeware from Le Creuset. I really think a huge part of the bread's success has to do with using this bakeware.
 |
| My very 1st attempt at making bread. OMG. |
 |
| Bread attempt #2. |
If you already have a dutch oven, proceed with the following recipe. If you don't have one, go get one and then come back here :) I played around with the recipe and have finally gotten it down to something that works well for me. Even though I changed a thing or two each time, the resulting appearance of the bread and the texture of it was always the same.


 |
| Christmas Dinner: My 4th and best loaf so far I think. |
Dutch Oven Artisan Bread
Serves 6-8
(Adapted from Frugal Living NW)
6 cups of all purpose flour
3 tbsp wheat gluten
1 tbsp salt
1/2 tsp active dry yeast + 2 tbsp warm water
3 cup cold water
1/4 to 1/3 cup flour for forming into a ball later
Add the yeast to the luke warm water and let it sit in a cup. Measure and combine the flour, gluten, and salt in a large bowl. Add the cold water. Stir the yeast mixture a bit and then add the yeast to the large bowl as well. Using a big fork or dough hook, just mix it all up until all the flour is incorporated. If you don't mix well, you could end up with pockets of dry flour inside the dough. That's it! Now cover with saran wrap and let it sit at room temperature for around 18 hours. I left mine to sit 24 hours once and it was fine.
Use the 1/4 cup of flour or more to flour your hands and the dough so that you can work it into a rough ball. Wrapped this entirely with parchment paper and then wrap over with a clean kitchen towel. Let this sit for around 2 hours so it can double in size.
Preheat oven to 425 F with your dutch oven inside. When the temperature is reached, remove the dutch oven and carefully dump the dough inside. This is definitely tricky. The dough will likely stick all over the parchment paper but try your best to put all of it in the dish. Bake covered for 40-45 minutes. Then remove the cover and bake for 10 minutes. Broil for another 2 minutes, if you need to brown the top a bit. Take out the bread and let it cool for about 10 minutes. Remove the bread and let it cool further on a cooling rack.
 |
| Bread dipped in olive oil & balsamic vinegar makes a great appetizer! |

I'm excited you're making the bread! Dutch ovens are used because they can tolerate high heat and you need it closed for the steam.
ReplyDeleteSomeone asked this question on Food 52 (http://food52.com/hotline/17638-crusty-bread-without-dutch-oven) and there are some great suggestions there. Good luck! :)
hi! Do you think this would still work without the long rise? what if I just let it rise til it doubled--I know the flavor may not be as complex, but would it still "work?" thanks!
ReplyDeleteThis is taken from the site I adapted my recipe from:
Delete"You’ll know your dough is ready when it has risen in the bowl, smells yeasty, darkened slightly, and is covered with small bubbles."
It could take less time to reach this point. If you do try it with significantly less rise time, let me know how it turned out for you! I haven't tried so I'm curious :)