Starbucks Drink Mini Cake
 |
| Starbucks drink mini cake |
I finally created a mini dessert I have always wanted to do. When I first got into cake making 8 years ago, I was blown away and inspired by custom cakes that looked like cappuccino mugs or coffee cups. Back then every decorated fondant cake impressed me! I knew nothing. Lol. One of the first cakes I ever pinned on Pinterest was a mini cake in the shape of a coffee mug. I never noticed anything like it before. Before becoming a mom and joining social media, that is.
 |
| Hunter X Hunter chocolate cake |
Last week, my son turned 11 years old. Yes, I have been a mom that long! It was the most relaxed birthday week I have ever had. He didn't want a birthday party. 10 years of throwing him parties and now he just wasn't interested. I did make him a birthday cake and I cooked him his favorite meals all week. But that was nothing compared to planning and throwing a party. While I was assembling his multi-layer chocolate peanut butter ganache cake, I also put together 3 little mini cakes using the same fillings. Why the heck not? These were frozen for a later project I did near the end of the week.


 |
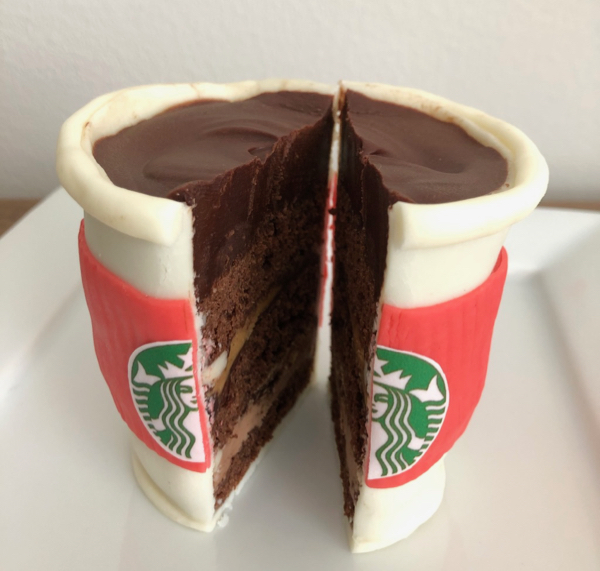
| 5 layers of chocolatey richness |
My 11yo's birthday cake was delicious but not blog worthy since it was decorated using a printed edible graphic. He's into Hunter X Hunter and that's just a hard cake to create around. Unless you go with a printed graphic. Plus, we weren't going to have a party so I went the easy route and did that. I did spend extra time on the fillings though. I used chocolate ganache with a generous peanut butter swirl, chocolate Swiss meringue buttercream, chocolate covered crushed crepe wafers to add a little crunch and vanilla Swiss meringue buttercream on the outside so that the graphic could stand out. These were the same fillings for the mini cakes I turned into Starbucks drinks!

Here's roughly what I used to put together for each of my Starbucks drink mini cakes:
- 3 layers of chocolate cake (taken from 1 1/2 chocolate cupcakes)
- 1 tbsp of peanut butter chocolate ganache
- 1 tbsp of chocolate Swiss meringue buttercream
- 1/2 tbsp of chocolate covered crushed crepe wafers
- 1 tbsp of chocolate ganache
- 3/4 cup of covering made from 50% fondant and 50% molding white chocolate
- 1/4 cup of covering tinted with a bit of red to create a nice pinkish hue
- Starbucks logo printed on an edible sheet
- 1 small (205ml) cup, cut in half so you can unfold it to use as a mold for tracing
- 1 coffee sleeve, cut horizontal in half to use as a mold for tracing and imprinting

I make my fondant and molding chocolate from scratch and I just love the taste of the two together. Molding chocolate itself is hard to work with but if you add a bit of fondant to it, it really helps. I do this for decorated cookies too. For these mini cakes you need to cut out and attach four pieces of fondant:
- Outer cup covering
- Round cutout for the bottom of the cake
- Roll a noodle to go around the top of the outer cup covering
- Sleeve covering


 |
| Store in the fridge or freezer, if you don't want to eat it that day. |
Attach the noodle around the top of the outer cup covering on the mat you are working on before putting it on the cake. Then wrap the partly frozen mini cakes with the covering. It's easier to do this while the cakes are still partly frozen since they aren't so fragile. The main trick to getting it to look like a Starbucks drink is to use an actual cup and actual sleeve to trace out the shape. The sleeve I used had corrugated ridges underneath which I then pressed into the fondant after cutting out the shape. It was perfect! The edible Starbucks logo was attached onto the sleeve using a bit of water. Easy peasy. After everything is done, put it back into the freezer or fridge. When you are ready to serve them, just take them out and let them return to room temperature before digging in. But don't forget to take pictures of your super adorable Starbucks drink mini cake before you eat it up! ;)


Comments
Post a Comment